神经网络——从 PLA 到 BP 神经网络
0. 推荐阅读
B 站白板推导系列二十三(没有任何数学推导,能够看得很舒服)
1. 感知机学习算法(Perceptron Learning Algorithm)
相信能看到神经网络的朋友对于机器学习的基础算法已经了解了个大概了,如果你没有听说过感知机算法,那么你可以将它简单理解为你很熟悉的一个算法的弱化版:支持向量机。
感知机学习算法的原始形态就是对于一个线性可分二分类类别标签,如何找出一个分离超平面去区分这两类数据。
说人话:对于二维坐标轴上的一堆散点,你能不能找出来一条线,依据类别标签把它们分成两类。
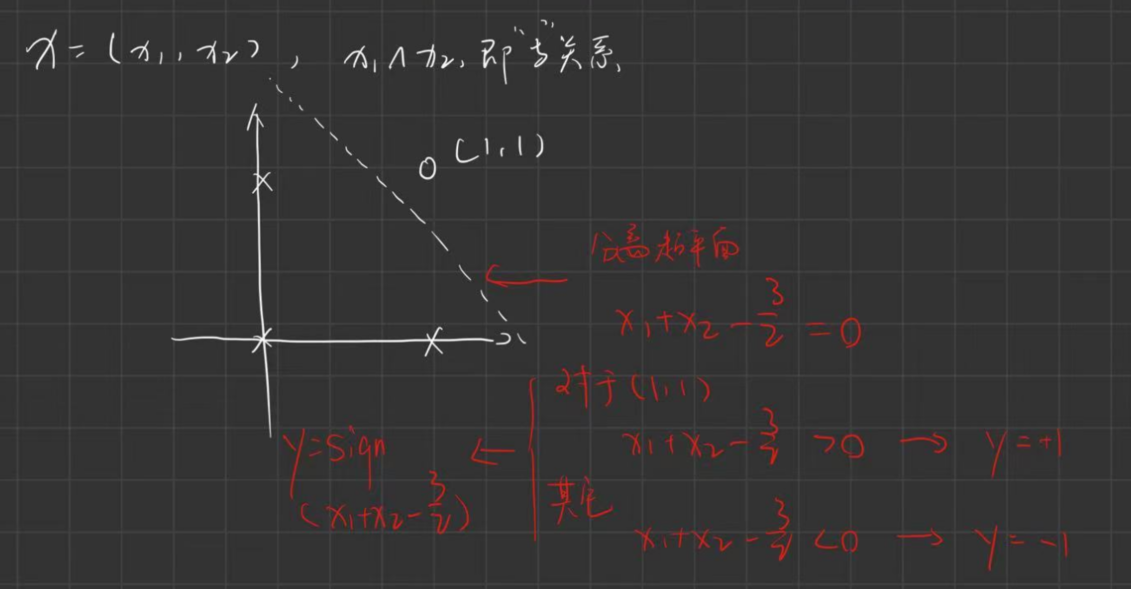
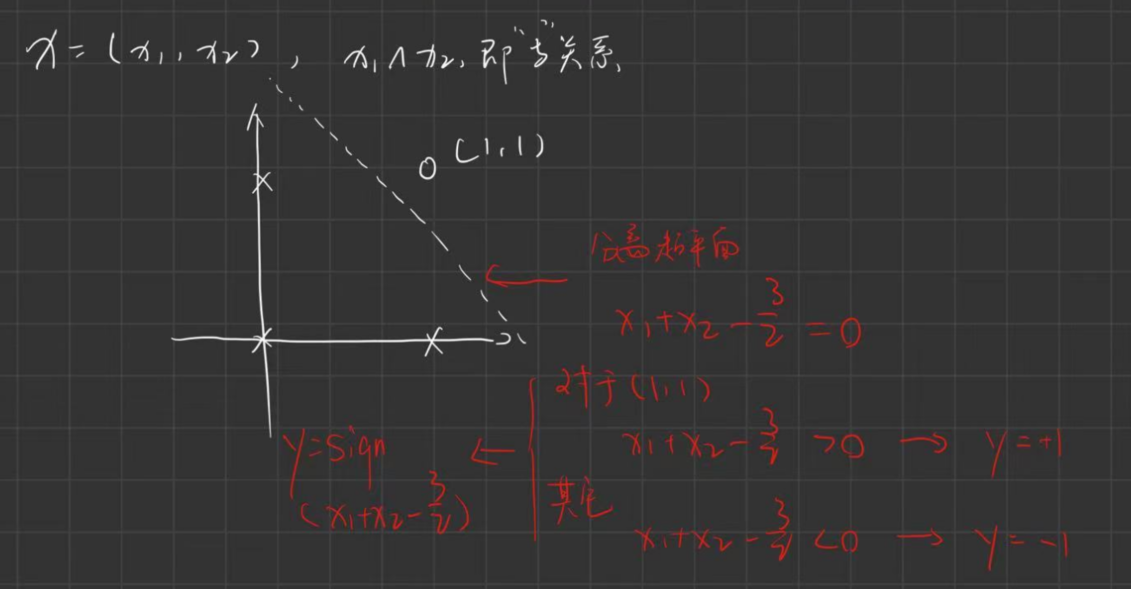
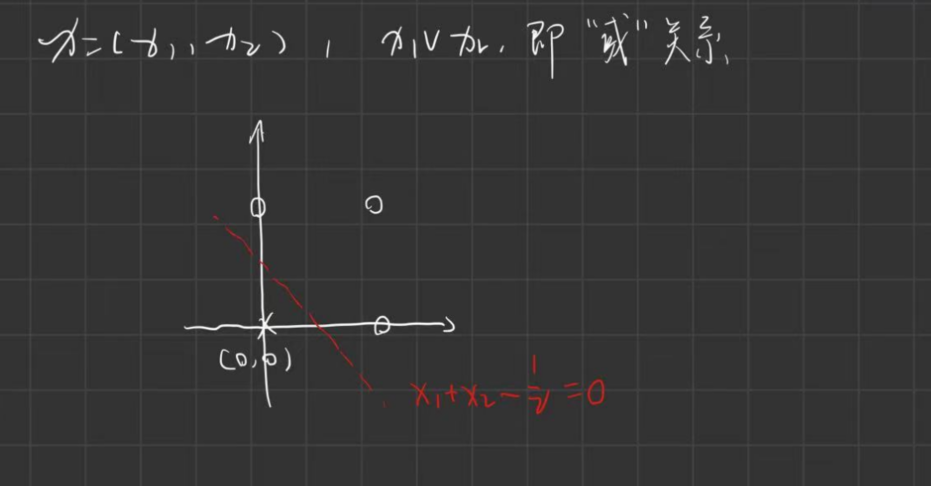
假设输入空间\(X = \{(x_1, x_2)\}\),特征空间\(Y=\{(+1/-1)\}\),我们有如下几个例子:
-
与关系

-
或关系

有了这两个我画的非常抽象的图,你可能已经理解什么叫线性可分,那么单层感知机算法的学习模型是什么呢?
其实就是寻找到\(wx + b = 0\)(这里的\(w x b\)均是向量)这样一个分离超平面,是不是非常简单?
那对于机器学习算法,跟模型同等重要的是学习策略,即如何取得我们想要的那个最优的模型,由于这章主要讲的是神经网络,所以损失函数的推导我就不细说了。最终会得到一个感知机模型的损失函数
\[L(w,b) = -\sum_{误分类的x}y_i(wx_i + b) \]
而我们的目的是求出 w 与 b,所以可以转化成一个最优化问题(让损失函数最小化)
\[w,b = argmin_{w,b}L(w,b) \]
那么这个最优化问题,我们可以用梯度下降的算法(这个有需求我再讲,因为我也不懂原理,只知道这样可以)来求,这边用的是随机梯度下降。
\[w \leftarrow w + \eta y_ix_i \\ b \leftarrow b + \eta y_i \]
这样我们就能求出最优解了!
那么问题来了,感知机模型要求线性可分,线性不可分又是什么样的情况?看下面的异或问题
- 异或关系
![图片[1]-Simple Neural Network - 玄机博客-玄机博客](https://qbd.heng.ink/wp-content/themes/zibll/img/thumbnail-lg.svg)
从图上可以看出,你没有办法找到一条直线将正负类分离开来,但是存在一条曲线能够分离。在 1969 有人证明了感知机没有办法解决异或问题,这就引出了接下来的多层感知机(神经网络)。
2. 神经网络(多层感知机)
线性不可分的问题,我们有带核方法的 SVM(Kernel SVM)和神经网络两种处理手段,Kernel SVM 是出现在神经网络之后的,这个我们不多讲,因为我也不懂。
在具体讲神经网络为什么有用之前,我们先理解一下神经网络是如何工作的。
- 神经元
神经元其实就是一个感知机,有输入\(x\),有权值\(w\),有偏置(bias)\(b\)当然你也可以叫它阈值(threshold)\(\theta\),有输出\(y\),最后就是你可能不太熟悉的激活函数\(f\)。
它的最终表达形式是这样的:
\[y = f(wx+b) \]
或者
\[y = f(wx-\theta) \]
图片形式:
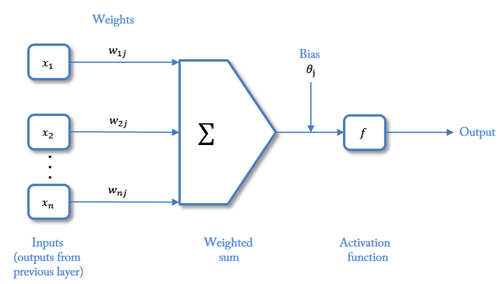
这里的激活函数,在单层感知机里就是符号函数,大于 0 取+1,小于 0 取-1。但是由于符号函数不可导,所以激活函数可以由各种 S 型曲线代替,比如 Sigmoid 函数:

也能起到符号函数的作用,只不过是大于 0.5 取+1,小于 0.5 取-1。
这个激活函数有什么作用?就是将线性的作用转成非线性的作用,这样多层叠加起来就不再可以被合并为一个线性的作用了,比如:
\[z = f(w_2f(w_1x+b_1) + b_2) \]
如果两个\(f\)均为\(y=x\),不难得出 z 与 x 是线性的关系。
- 神经元叠加
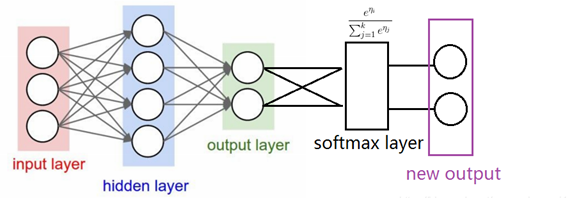
实际上神经元的叠加就是将前一个神经元的输出作为后一个神经元的输入,继续进行加权求和、加偏置、激活的流程。
图中的 input layer 即是输入空间\(X = \{(x_1,x_2,x_3)\}\), hidden layer 为隐藏层,可以不只有一层,就是神经元叠加的层。output layer 为输出空间,图上所指为\(Y = \{(y_1,y_2)\}\)。
有证明指出超过一层隐藏层的神经网络可以拟合任意函数,这就是神经网络强大的原因。
至于为什么现在发展的是深度学习(增加隐藏层),而不是广度学习(增加神经元个数),这就是另外一个问题了。
3. BP 神经网络
在介绍完多层感知机之后,朋友们对神经网络有了个感性认知。第三节讲讲计算规则简单的前馈反向传播(Back Propagation)神经网络。
我们知道,感知机学习算法是基于 Loss Function 的随机梯度下降法,这也是机器学习的核心思想(应该是)。经典的损失函数就是线性回归中的最小二乘法和逻辑回归中的交叉熵损失函数(与高斯噪声 MLE 等价),
而在神经网络中,依赖 Loss Function 的梯度下降依旧是学习算法的核心,而损失函数的选择则是依据模型而选择,在此不详细说明。
那么对于具有复杂网络结构的神经网络如何对损失函数梯度下降从而求出参数呢,这就是 BP 神经网络的作用。
BP 神经网络的思想很简单,就是求导的链式法则,目的就是得到 loss function 关于参数 weight 与 bias 的梯度,小例子如下。
第一阶段-前向传播过程
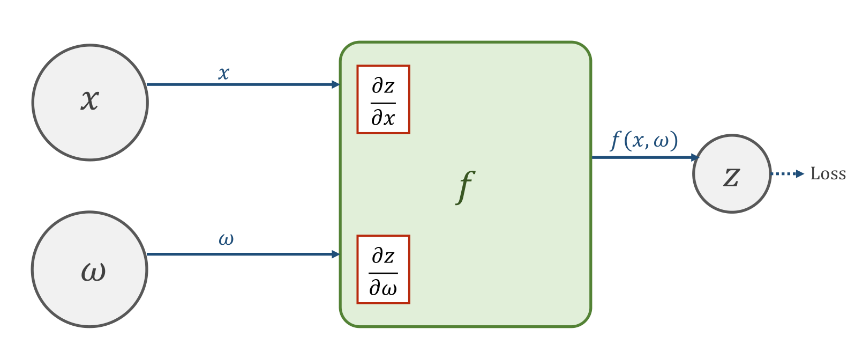
(这张图与前面的图不太一样,不过应该也能看明白)
此图对应的函数为
\[z = f(wx) \]
z 作为输出
在向前计算的时候,同步计算好导数\(\frac{\partial z}{\partial x}\)以及\(\frac{\partial z}{\partial \omega}\),并将其保存下来。(在计算完 loss 有用)
第二阶段-反向传播过程
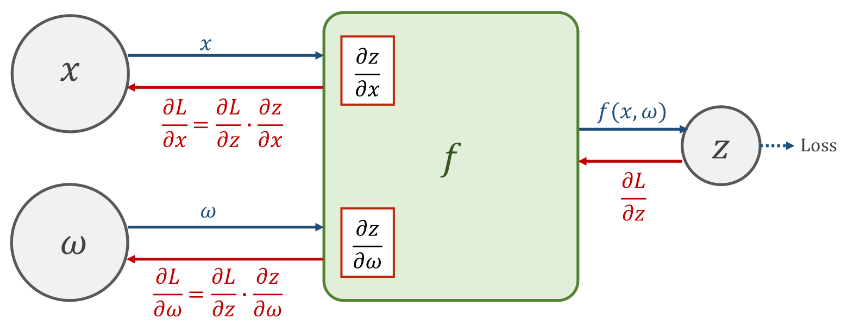
\[loss = L(\hat{z} – z) \]
在继续向前得到损失值 loss 的时候,前面的神经元会将\(\frac{\partial loss}{\partial z}\)的值反向传播给原先的神经元,在计算单元\(f(x,\omega)\)中,将得到的\(\frac{\partial loss}{\partial x}\)与之前存储的导数相乘,即可得到损失值对于权重以及输入层的导数,即\(\frac{\partial loss}{\partial x}\),以及\(\frac{\partial loss}{\partial \omega}\)。
基于该梯度才进行权重的调整
即
\[\frac{\partial loss}{\partial w} = \frac{\partial loss}{\partial z} \times \frac{\partial z}{\partial w} \]
更新策略为
\[w \leftarrow w – \eta \frac{\partial loss}{\partial w} \]
其中\(\eta\)为学习率,\(0<\eta<1\)。
4. 手工计算 BP
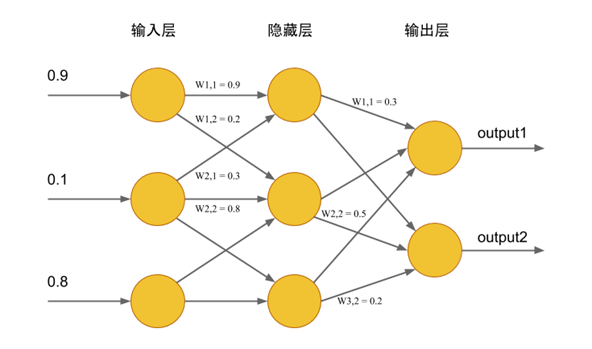
如果你看懂了一个神经元的更新,那么恭喜你学会了 BP 神经网络!让我们来做一个练习题(源自 play 老师的 ppt):
请你更新一下权重

真实值
\[Y = \left[\begin{matrix} 0.01 \\ 0.99 \end{matrix} \right] \]
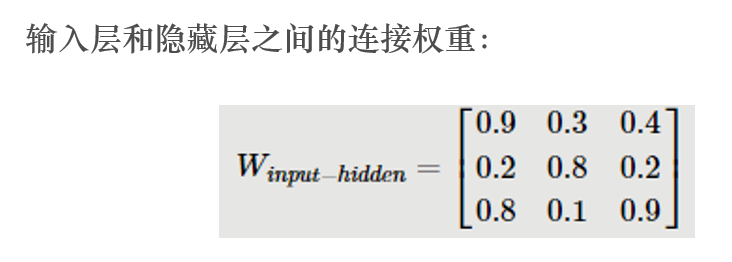
这个图实际上有些问题,比如\(W_{input-hidden}\)的第一行第三列是 0.4,但是实际上第三个输入和隐藏层第一个结点没有连线,我们以权重矩阵为准。
前向:
\[X_{hidden} = W_{input-hidden}X = \left[ \begin{matrix} 0.9 & 0.3 & 0.4 \\ 0.2 & 0.8 & 0.2 \\ 0.8 & 0.1 & 0.9 \end{matrix} \right] \left[ \begin{matrix} 0.9 \\ 0.1 \\ 0.8 \end{matrix} \right] = \left[ \begin{matrix} 1.16 \\ 0.42 \\ 0.62 \end{matrix} \right] \]
\[Output_{hidden} = Sigmoid(X_{hidden}) = Sigmoid( \left[ \begin{matrix} 1.16 \\ 0.42 \\ 0.62 \end{matrix} \right]) = \left[ \begin{matrix} 0.761 \\ 0.603 \\ 0.650 \end{matrix} \right] \]
\[X_{output} = W_{hidden-output}Output_{hidden} = \left[ \begin{matrix} 0.3 & 0.7 & 0.5 \\ 0.6 & 0.5 & 0.2 \end{matrix} \right] \left[ \begin{matrix} 0.761 \\ 0.603 \\ 0.650 \end{matrix} \right] = \left[ \begin{matrix} 0.975 \\ 0.888 \end{matrix} \right] \]
\[Output_{output} = Sigmoid(X_{output}) = \left[ \begin{matrix} 0.726 \\ 0.708 \end{matrix} \right] \]
反向:
简单起见,我们只做一个权重值的更新(挑个简单的,第二层的\(w_{1,1} = 0.3\))
损失函数:
\[L(W) = (Output – Y)^T(Output – Y) = 0.59218 \]
我们的目标是:
\[\frac{\partial L(W)}{\partial w_{1,1}} = \frac{\partial L(W)}{\partial Output_{1}} \frac{\partial Output_{1}}{\partial X_{output1}}\frac{\partial X_{output1}}{\partial w_{1,1}} \]
更清晰一点(指矩阵形式转成求和形式),对应函数为:
\[L(W) = (Output_1 – Y_1)^2 + (Output_2 – Y_2)^2 \]
\[Output_1 = Sigmoid(X_{output1}) \]
这里\(w_{1,1}\)指第一个隐藏层输出对应第一个输出的权值,实际上权值矩阵是转置后的
\[X_{output1} = w_{1,1} * Output_{hidden1} + w_{2,1} * Output_{hidden2} + w_{3,1} * Output_{hidden3} \]
计算偏导
\[\frac{\partial L(W)}{\partial Output_{1}} = 2(Output_1 – Y_1) = 1.432 \]
\[\frac{\partial Output_{1}}{\partial X_{output1}} = Output_1(1 – Output_1) = 0.1989 \]
\[\frac{\partial X_{output1}}{\partial w_{1,1}} = Output_{hidden1} = 0.761 \]
最后得出答案
\[\frac{\partial L(W)}{\partial w_{1,1}} = 1.432 \times 0.1989 \times 0.761 = 0.217 \]
更新一下权重
\[\eta = 0.5 \\ w_{1,1} = w_{1,1} – \eta \frac{\partial L(W)}{\partial w_{1,1}} = 0.3 – 0.5 \times 0.217 = 0.1915 \]
大功告成!是不是很简单(我知道不简单),不过好在你只要知道怎么算就行了,具体调包就完事了。
5. 调包实现 BP
包介绍
在 R 语言中可以用 nnet 和 neuralnet 包实现,前者参数简单,后者参数复杂。
看看就好,看例子就会了
单层的前向神经网络模型在包 nnet 中的 nnet 函数,其调用格式为:
nnet(formula, data, weights, size, Wts, linout = F, entropy = F, softmax = F, skip = F, rang = 0.7,decay = 0, maxit = 100, trace = T)
拟合
predict(model, data)
参数说明:
size, 隐层结点数;
decay(就是学习率), 表明权值是递减的(可以防止过拟合);
linout, 线性输出单元开关;
skip,是否允许跳过隐层;
maxit, 最大迭代次数;
Hess, 是否输出 Hessian 值(似乎是用来判断函数凹凸性的,Hessian(半)正定则为凸函数)
可多层的 neuralnet 包
neuralnet(formula, data, hidden = 1, threshold = 0.01,stepmax = 1e+05, rep = 1, startweights = NULL,learningrate.limit = NULL,learningrate.factor = list(minus = 0.5, plus = 1.2),learningrate=NULL, lifesign = "none",lifesign.step = 1000, algorithm = "rprop+",err.fct = "sse", act.fct = "logistic",linear.output = TRUE, exclude = NULL,constant.weights = NULL, likelihood = FALSE)
拟合
compute(model, data(without output column))
参数说明:
formula :公式
data :建模的数据
hidden :每个隐藏层的单元个数(可以用向量添加隐层数目,如 c(6,4))
threshold :误差函数的停止阈值
stepmax :最大迭代次数
rep :神经网络训练的重复次数
startweights :初始权值,不会随机初始权值
learningrate.limit :学习率的上下限,只针对学习函数为 RPROP 和 GRPROP
learningrate.factor :同上,不过可以是针对多个
learningrate :算法的学习速率,只针对 BP 算法
lifesign :神经网络计算过程中打印多少函数{none、minimal、full}
lifesign.stepalgorithm :计算神经网络的算法{ backprop , rprop+ , rprop- , sag , slr }
err.fct :计算误差,’{sse,se}
act.fct :激活函数,{logistic,tanh}
linear.output :是否线性输出,即是回归还是分类
exclude :一个用来指定在计算中将要排除的权重的向量或矩阵,如果给的是一个向量,则权重的位置很明确,如果是一个 n*3 的矩阵,则会排除 n 个权重,第一列表示层数,第二列,第三列分别表示权重的输入单元和输出单元
constant.weights :指定训练过程中不需要训练的权重,在训练中看做固定值
likelihood :逻辑值,如果损失函数使负对数似然函数,那么信息标准 AIC 和 BIC 将会被计算
实例
数据:混凝土强度数据集
Pre
concrete <- read.csv("concrete.csv")
str(concrete)

# 没有证据表明归一化会有效,但确实有点效
normalize <- function(x) {
  return((x - min(x)) / (max(x) - min(x)))
}

# apply normalization to entire data frame
concrete_norm <- as.data.frame(sapply(concrete, normalize))

# confirm that the range is now between zero and one
summary(concrete_norm$strength)

# compared to the original minimum and maximum
summary(concrete$strength)

# create training and test data
set.seed(20021119)
index <- sample(x=c(1,2),nrow(concrete_norm),replace=T, prob=c(0.75,0.25))
concrete_train <- concrete_norm[index==1, ] #75%
concrete_test <- concrete_norm[index==2, ] #25%
summary(concrete_train$strength)
nnet
library(nnet)
nnet <- nnet(concrete_train$strength~., data=concrete_train,
             size = 10,decay = 5e-4, maxit = 200)
summary(nnet)
pred = predict(nnet, concrete_test)
cor(pred, concrete_test$strength)
plot(pred, concrete_test$strength)
neuralnet
无参数
library(neuralnet)

# simple ANN with only a single hidden neuron
set.seed(20021119) # to guarantee repeatable results
concrete_model <- neuralnet(strength ~ cement + slag +
                              ash + water + superplastic +
                              coarseagg + fineagg + age,
                            data = concrete_train)

# visualize the network topology
plot(concrete_model)

## Step 4: Evaluating model performance ----

# obtain model results
model_results <- compute(concrete_model, concrete_test[1:8])

# obtain predicted strength values
predicted_strength <- model_results$net.result

# examine the correlation between predicted and actual values
cor(predicted_strength, concrete_test$strength)
plot(predicted_strength, concrete_test$strength)
调参数
concrete_model2 <- neuralnet(strength ~ cement + slag +
                               ash + water + superplastic +
                               coarseagg + fineagg + age,
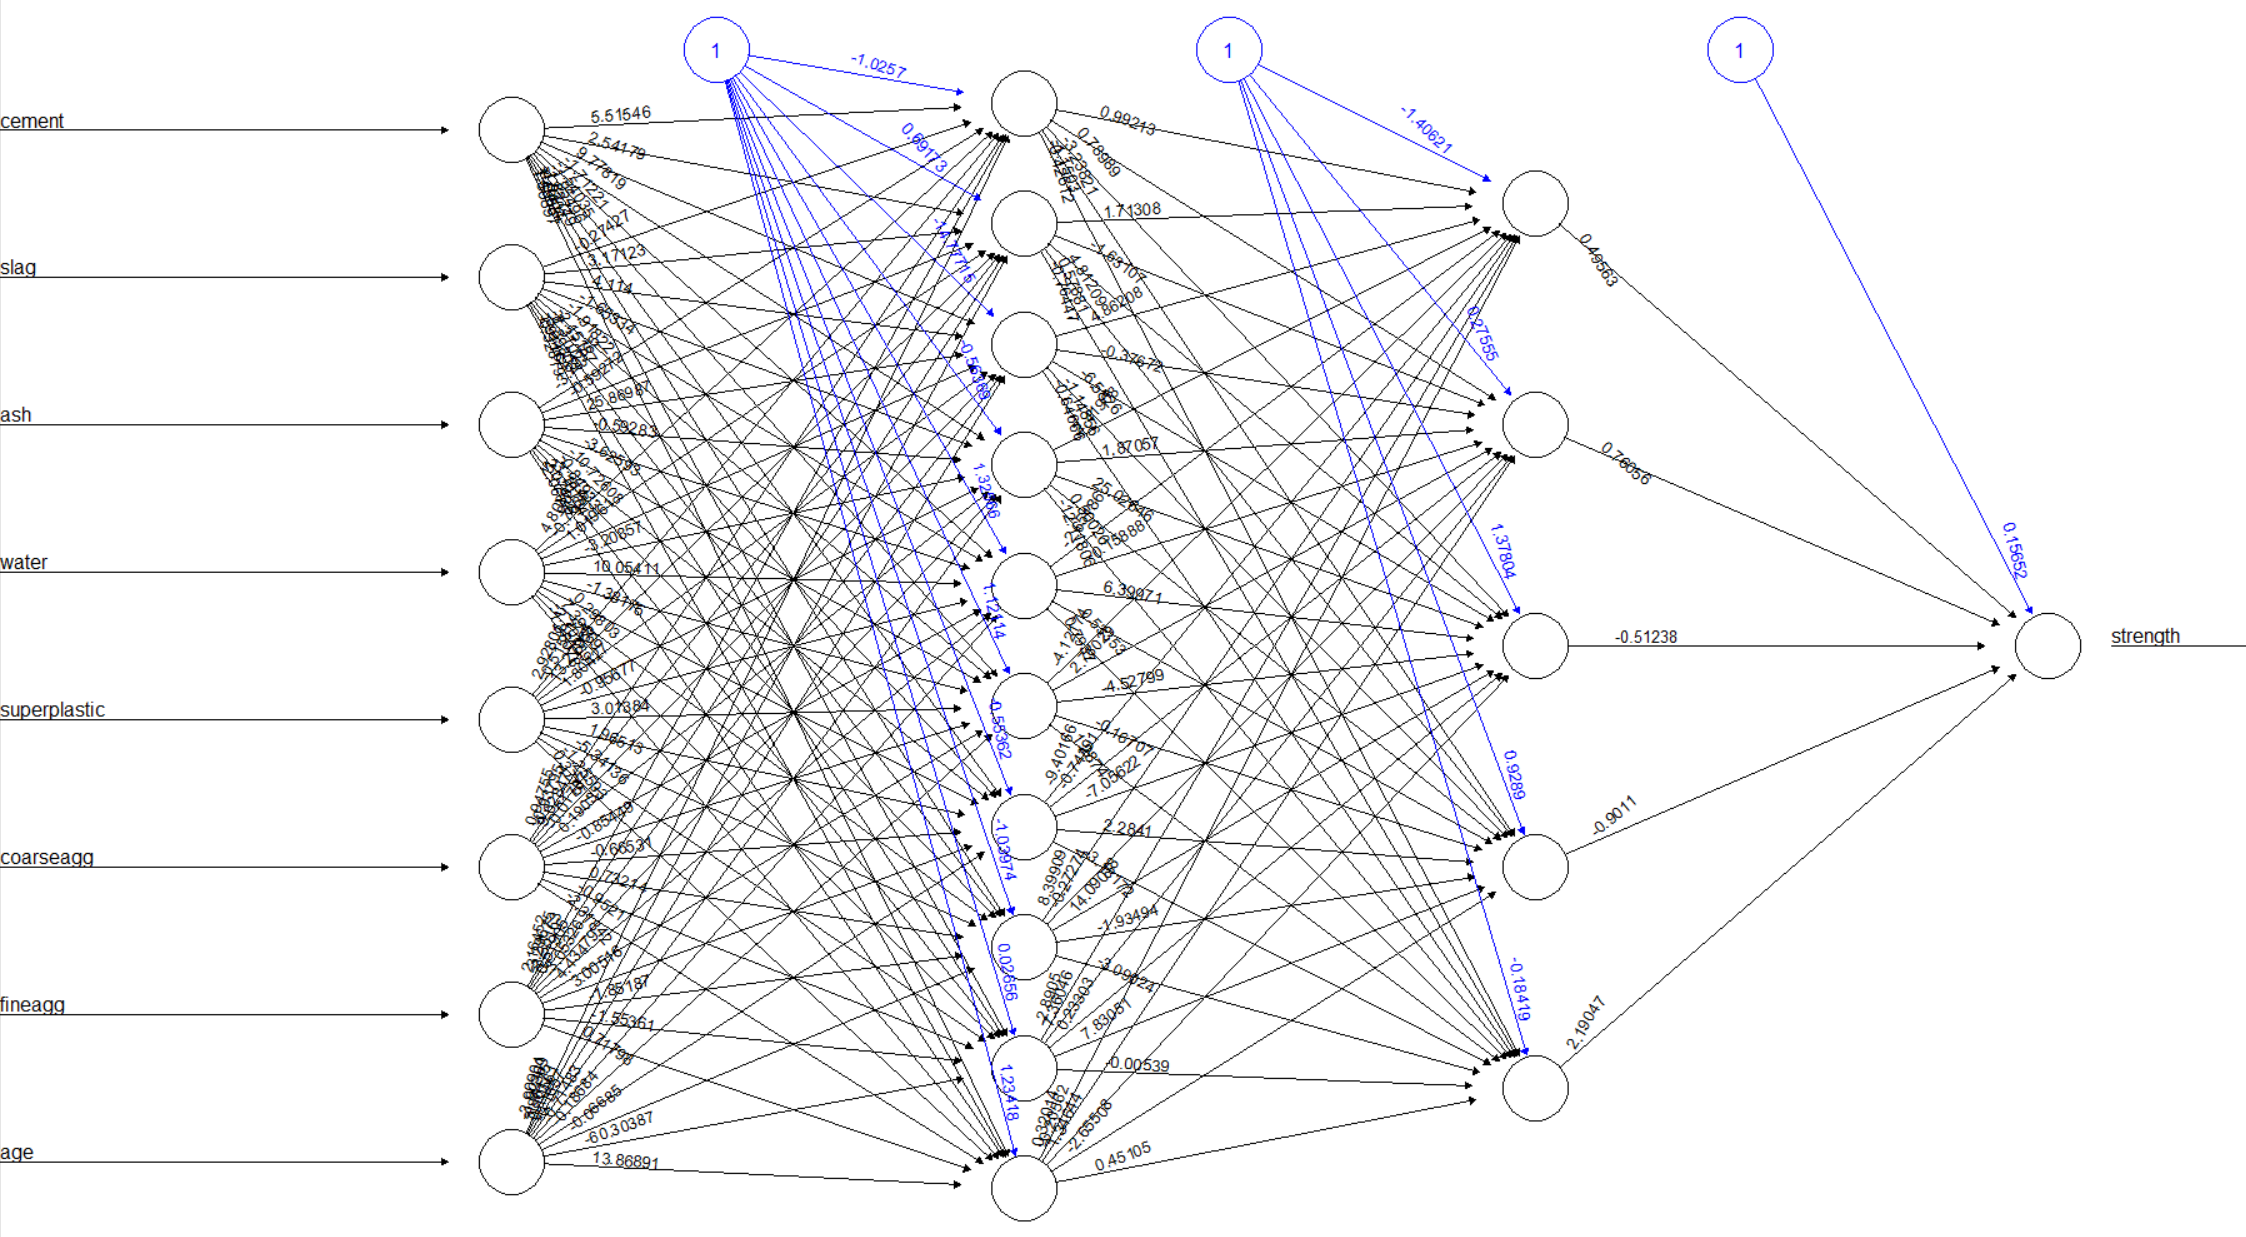
                             data = concrete_train, hidden =c(10,5))
# 通过hidden的向量化控制隐层数目
# plot the network
plot(concrete_model3)

# evaluate the results as we did before
model_results3 <- compute(concrete_model3, concrete_test[1:8])
predicted_strength3 <- model_results3$net.result
cor(predicted_strength3, concrete_test$strength)
plot(predicted_strength3, concrete_test$strength)
模型网络结构
1.本站内容仅供参考,不作为任何法律依据。用户在使用本站内容时,应自行判断其真实性、准确性和完整性,并承担相应风险。
2.本站部分内容来源于互联网,仅用于交流学习研究知识,若侵犯了您的合法权益,请及时邮件或站内私信与本站联系,我们将尽快予以处理。
3.本文采用知识共享 署名4.0国际许可协议 [BY-NC-SA] 进行授权
4.根据《计算机软件保护条例》第十七条规定“为了学习和研究软件内含的设计思想和原理,通过安装、显示、传输或者存储软件等方式使用软件的,可以不经软件著作权人许可,不向其支付报酬。”您需知晓本站所有内容资源均来源于网络,仅供用户交流学习与研究使用,版权归属原版权方所有,版权争议与本站无关,用户本人下载后不能用作商业或非法用途,需在24个小时之内从您的电脑中彻底删除上述内容,否则后果均由用户承担责任;如果您访问和下载此文件,表示您同意只将此文件用于参考、学习而非其他用途,否则一切后果请您自行承担,如果您喜欢该程序,请支持正版软件,购买注册,得到更好的正版服务。
5.本站是非经营性个人站点,所有软件信息均来自网络,所有资源仅供学习参考研究目的,并不贩卖软件,不存在任何商业目的及用途

![图片[1]-Simple Neural Network - 玄机博客-玄机博客](https://cdn.jsdelivr.net/gh/Blackteaxx/Graph@master/img/20230505001701.png)


暂无评论内容